An inbound form can start a Dasha voice call within seconds, but the call result arrives later. A reliable HubSpot workflow therefore needs two Zaps: one to create the call and save its ID, and another to receive the terminal event and update the same contact. This implementation covers the exact properties, payloads, correlation checks, security controls, and tests needed to automate lead qualification without mistaking a queued call for a completed conversation.
Architecture: two Zaps, one HubSpot contact
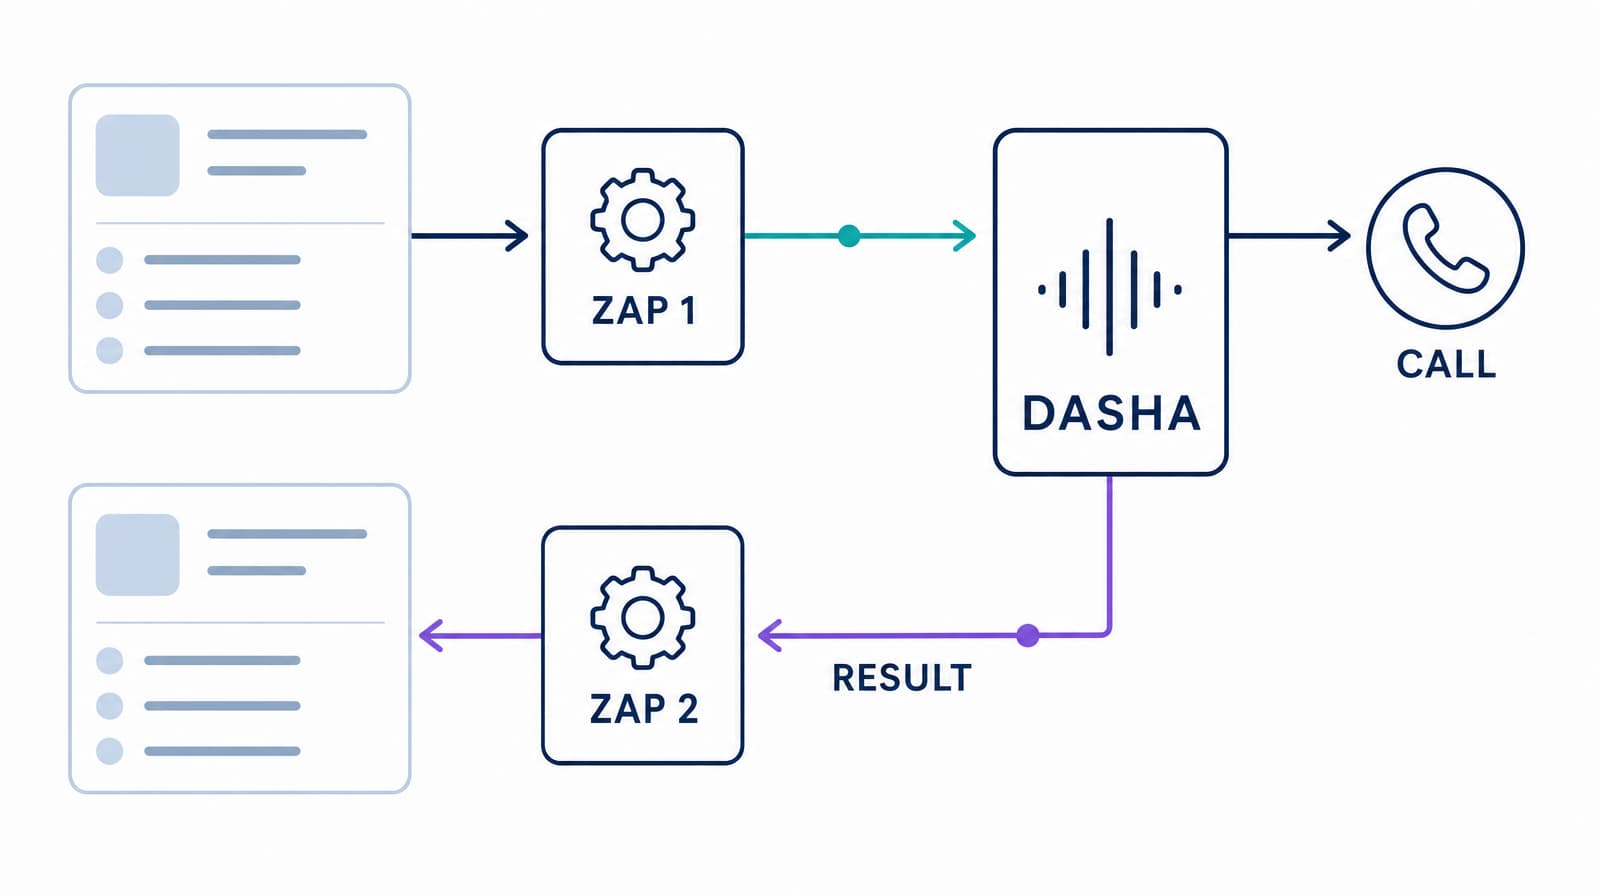
Use two independent Zaps for this integration:
- Zap 1, form to call: HubSpot's
New Form Submissiontrigger identifies an eligible contact. API by Zapier sends an authenticated request to Dasha, then saves the returnedcallIdon that contact. - Zap 2, result to contact: Dasha sends a terminal result event to a Webhooks by Zapier Catch Hook. The Zap uses
hubspotContactIdandcallIdto update that same contact.
This split reflects the call lifecycle. A successful Dasha call request returns HTTP 201 when the call record is created. Its initial status can be Created. The person has not necessarily answered, completed the conversation, or qualified at that point. Those outcomes arrive later through the result webhook.
For current Dasha agents, use the REST API and result-webhook contract below. The older native Zapier connector uses an earlier application and SIP-trunk model and does not expose the current agent, additionalData, and webhook contract.
| Stage | System | Contract | Durable identifier |
|---|---|---|---|
| Form submitted | HubSpot to Zap 1 | New Form Submission | HubSpot Contact ID plus source event ID |
| Call created | Zap 1 to Dasha | POST /api/v1/calls?agentId=... | Dasha callId |
| Result delivered | Dasha to Zap 2 | Agent resultWebhook | callAdditionalData.hubspotContactId plus callId |
| Contact updated | Zap 2 to HubSpot | Update Contact | Same HubSpot Contact ID |
Prerequisites
Prepare these components before building either Zap:
- A tested and enabled Dasha agent with an outbound number linked to it.
- The Dasha agent ID and an API key with access to that agent.
- A published HubSpot form that collects a required phone number and any consent fields your policy needs.
- A stable way to resolve the form submission to a HubSpot Contact ID.
- Zapier connections for HubSpot, API by Zapier, and Webhooks by Zapier.
- A defined calling window, consent rule, suppression rule, and retry limit.
- Permission to create HubSpot Contact properties and workflows.
Zapier app events, field labels, premium-app access, and HubSpot workflow actions can vary by account, app version, and plan. Confirm the labels and availability shown in your own accounts before enabling traffic. Do not assume that a field name shown in a test account will appear identically in production.
Create the HubSpot Contact properties
In HubSpot, go to Settings > Properties > Contact properties > Create property. Create the integration fields before mapping either Zap. HubSpot lets you set an internal property name during creation, and that internal name cannot be changed later. Enumeration options also have internal names used by APIs and integrations. Use the full property editor so you can set both explicitly, as described in HubSpot's property editor guide.
| Property label | Internal name | HubSpot field type | Values or purpose |
|---|---|---|---|
| Dasha call ID | dasha_call_id | Single-line text | Current Dasha call correlation ID |
| Dasha source event ID | dasha_source_event_id | Single-line text | Form-submission deduplication key |
| Dasha last event key | dasha_last_event_key | Single-line text | callId:type idempotency key |
| Dasha integration state | dasha_integration_state | Dropdown select | call_created, completed, failed, deadline_expired, correlation_error |
| Dasha qualification status | dasha_qualification_status | Dropdown select | qualified, nurture, disqualified, unknown |
| Dasha qualification score | dasha_qualification_score | Number | Integer from 0 to 100 |
| Dasha qualification summary | dasha_qualification_summary | Multi-line text | Concise post-call summary |
| Dasha follow-up required | dasha_follow_up_required | Single checkbox | Boolean |
| Dasha follow-up action | dasha_follow_up_action | Dropdown select | sales_call, nurture, manual_review, none |
| Dasha do-not-contact requested | dasha_do_not_contact_requested | Single checkbox | Boolean captured from the conversation |
| Dasha completed at | dasha_completed_at | Date and time picker | Exact terminal-event completedTime |
| Dasha last error | dasha_last_error | Multi-line text | Failure or deadline reason |
When creating a dropdown option, set its internal name to the lowercase value shown above. The visible label can be friendlier, such as “Sales call,” while the integration value stays sales_call. HubSpot's property creation instructions also document the permissions and subscription limits that can affect custom properties.
Keep your existing legal suppression and consent properties separate from dasha_do_not_contact_requested. The Dasha field records what the conversation produced. A HubSpot workflow applies your approved suppression policy.
Configure structured post-call analysis in Dasha
Open the Dasha agent, then go to Features > Post-Call Analysis > Add Analysis Form. Configure a post-call analysis named lead_qualification. Keep the output small and typed so Zapier can map it without parsing transcript prose.
{
  "name": "lead_qualification",
  "isEnabled": true,
  "labels": [
    {
      "name": "qualification_status",
      "description": "Classify the contact as qualified, nurture, disqualified, or unknown using the approved qualification rubric.",
      "type": "enum",
      "values": ["qualified", "nurture", "disqualified", "unknown"],
      "required": true
    },
    {
      "name": "qualification_score",
      "description": "Return an integer from 0 to 100 using the approved qualification rubric.",
      "type": "number",
      "required": true
    },
    {
      "name": "qualification_summary",
      "description": "Summarize the need, fit, timing, and key constraint in no more than two sentences.",
      "type": "string",
      "required": true
    },
    {
      "name": "follow_up_required",
      "description": "True when a permitted human or nurture follow-up is needed.",
      "type": "boolean",
      "required": true
    },
    {
      "name": "follow_up_action",
      "description": "Select the recommended next step.",
      "type": "enum",
      "values": ["sales_call", "nurture", "manual_review", "none"],
      "required": true
    },
    {
      "name": "do_not_contact_requested",
      "description": "True when the contact asks the company to stop future outreach.",
      "type": "boolean",
      "required": true
    }
  ]
}
Dasha supports string, boolean, number, and enum post-call labels. The completed result places their values under result.postCallAnalysis. Configure and review these labels using the post-call analysis guide.
The analysis recommends an outcome. HubSpot still owns the thresholds and actions. This keeps a prompt change from silently altering owner assignment, task creation, nurture enrollment, or suppression policy.
Zap 1: start the call from a HubSpot form
1. Trigger on a new form submission
In HubSpot, open More > Marketing > Forms > Create form > Form Editor to create or confirm the inbound form. Then create a Zap with:
- App: HubSpot
- Event:
New Form Submission - Form: the specific inbound form that should start qualification
Test with a controlled contact that has a phone number, a required email, and explicit test consent. Never place credentials or sensitive production data in a Zap name, screenshot, or test record.
2. Resolve the HubSpot Contact ID
Inspect the trigger output for a stable Record ID, Contact ID, or contact ID. Use that value when it is present.
Some form-trigger outputs omit the Contact ID. In that case:
- Add HubSpot's
Find Contactaction. - Search the email property using the required email from the form.
- Confirm the returned email matches the normalized submitted email.
- Confirm the returned Contact ID is present.
- Stop and alert when either check fails.
This is a fallback for a verified form email. Never guess a Contact ID, create a second contact, or correlate by phone number. Zapier's HubSpot app directory lists the current New Form Submission, Find Contact, and Update Contact events, although the output labels you see can differ by account.
Create a sourceEventId next. Prefer a unique submission or event ID from the trigger. If the trigger does not provide one, build a deterministic value from the form ID, resolved Contact ID, and exact submission timestamp:
formId:hubspotContactId:submittedAt
The same submission must produce the same value on replay.
3. Apply the eligibility filter
Fetch any Contact properties that were not included in the form trigger, then place the filter before the Dasha request. Require every condition below:
- The phone number is normalized to E.164, for example
+14155550123. A practical validation pattern is^\+[1-9]\d{7,14}$. - The required consent property permits this call.
- The contact is absent from your do-not-contact and suppression states.
- The contact's local time is inside the permitted calling window.
- The source event differs from
dasha_source_event_id. - No call is already active for the contact.
- Any retry is explicitly permitted and remains below your retry limit.
If the contact timezone is unknown, stop the call path or send the record to manual review. Do not substitute the Zap owner's timezone. Set the calling window and retry policy from your organization's rules and applicable requirements.
Dasha's optional callDeadline is the latest acceptable time to complete the attempt. It is not a delayed-start timestamp. Use a separate scheduler when the call should begin later.
4. Store the Dasha key in API by Zapier
Prefer an API by Zapier managed connection:
- Authentication type:
Static Headers (API key) - Header:
Authorization: Bearer YOUR_DASHA_API_KEY - Domain filter:
blackbox.dasha.ai
API by Zapier stores static credentials in the connection and restricts the domains where the connection can send them. Zapier's current API connection guide classifies API by Zapier as a Premium app and a public beta, so this setup requires a paid Zapier plan.
Never put the Dasha key in a URL, request body, Zap name, screenshot, comment, or test record. Restrict connection access and rotate the key if it appears in any of those places.
5. Send the call request
Add an API Request action with:
- Method:
POST - URL:
https://blackbox.dasha.ai/api/v1/calls?agentId=YOUR_AGENT_ID - Header:
Content-Type: application/json - Body: JSON
{
  "endpoint": "{{phone_e164}}",
  "callDeadline": "{{latest_acceptable_attempt_iso_8601}}",
  "timezone": "{{contact_timezone}}",
  "additionalData": {
    "hubspotContactId": "{{hubspot_contact_id}}",
    "sourceEventId": "{{source_event_id}}",
    "firstName": "{{first_name}}"
  }
}
Keep hubspotContactId and sourceEventId as strings. Pass only the context the call needs. Dasha returns this object in every result webhook as callAdditionalData, which is how Zap 2 recovers both stable identifiers. The outbound calling guide documents the endpoint, optional scheduling fields, and lifecycle.
API by Zapier does not automatically make every mapped value safe inside hand-written JSON. Test names with spaces, apostrophes, and non-ASCII characters. Inspect the resolved body and confirm it remains valid JSON.
6. Save callId immediately
A successful create response is HTTP 201 and includes callId, status, and nextScheduleTime. Update the resolved HubSpot contact in the next Zap step:
| HubSpot property | Value |
|---|---|
dasha_call_id | Response callId |
dasha_source_event_id | Current sourceEventId |
dasha_integration_state | call_created |
dasha_last_error | Clear the prior error |
Do not set qualification status, summary, follow-up, or completion time in Zap 1. A created call is still asynchronous.
Alert if the HubSpot write fails after Dasha returns 201. Recover by writing the existing response callId to the intended contact. Replaying the call-creation request can place a second call.
Zap 2: return the Dasha result to the same contact
1. Create a Catch Hook
Create a second Zap:
- App: Webhooks by Zapier
- Event:
Catch Hook
Copy the unique HTTPS URL and treat it as sensitive. A Catch Hook parses the JSON body into fields for later actions. Zapier's webhook trigger guide explains testing, response behavior, and URL ownership.
In Dasha, go to Agent > Settings > Webhooks and set the agent's resultWebhook URL to that Catch Hook. Dasha result webhooks send terminal events as HTTP POST requests, and the webhook configuration guide supports custom request headers.
Dasha's public documentation does not establish a result-webhook signature. It also does not establish that a direct Zapier Catch Hook can validate Dasha's custom header before accepting the request. Do not describe this direct path as cryptographically authenticated. If you need stronger authentication, send Dasha events to a validating intermediary that checks a secret header, enforces the agent and organization IDs, stores the idempotency key, acknowledges quickly, and then forwards the accepted event to Zapier.
2. Allow only the three terminal event types
Route on the exact type discriminator documented in Dasha's webhook event reference:
CompletedWebHookPayloadFailedWebHookPayloadCallDeadLineWebHookPayload
Use Zapier Paths or separate filtered Zaps. Reject or quarantine every unexpected type. A StartWebHookPayload, transfer event, or tool event must never update qualification fields.
3. Correlate before every update
Run these checks in each terminal path:
- Read
callAdditionalData.hubspotContactIdandcallAdditionalData.sourceEventId. - Build the event key as
callId:type. - Retrieve the HubSpot contact by
hubspotContactId. - Confirm the retrieved Contact ID equals
hubspotContactId. - Confirm HubSpot
dasha_call_idequals the webhookcallId. - Confirm HubSpot
dasha_source_event_idequalscallAdditionalData.sourceEventId. - Stop if
dasha_last_event_keyalready equals the event key. - Apply the path-specific update to that Contact ID.
Never fall back to endpoint or phone matching in Zap 2. A mismatch should produce an operator alert and no business-state update. You can set correlation_error only through a separate trusted recovery path, since writing it to an unverified contact would defeat the check.
Use callId + type as the idempotency key. The HubSpot field stops ordinary duplicate deliveries. Workflows that can create expensive or irreversible side effects should use a validating intermediary with an atomic event ledger so concurrent duplicates cannot both pass a read-before-write check.
4. Map each terminal payload separately
| Dasha event | HubSpot update |
|---|---|
CompletedWebHookPayload | Set state to completed. Map result.postCallAnalysis values to qualification status, score, summary, follow-up required, follow-up action, and do-not-contact requested. Set dasha_completed_at from the payload's exact completedTime. Set dasha_last_event_key. Clear the prior error. |
FailedWebHookPayload | Set state to failed and qualification status to unknown. Map errorMessage to dasha_last_error. Set dasha_completed_at from completedTime and save the event key. |
CallDeadLineWebHookPayload | Set state to deadline_expired and qualification status to unknown. Map reasonMessage when present. Set dasha_completed_at only when the payload contains completedTime. Save the event key. |
Map dropdowns using their internal values, such as qualified and sales_call. Visible labels are for people; integrations depend on internal values. Map the Dasha booleans to HubSpot single-checkbox values, and verify the resolved fields during the Zap test.
Do not replace completedTime with the time Zapier received the hook. Delivery can be delayed, so the receipt time is not a precise completion time.
Let HubSpot workflows own routing and follow-up
Zap 2 should finish after updating the contact. HubSpot workflows should decide what happens next.
A contact-based workflow can enroll when dasha_last_event_key changes and branch in this order:
- Suppression: If
dasha_do_not_contact_requestedis true, apply your approved suppression process, prevent further calls, and skip sales and nurture actions. - Qualified: If
dasha_integration_stateiscompleted, status isqualified, and the score meets your threshold, assign or rotate the owner, create the sales task, and send the permitted notification. - Nurture: If status is
nurture, enroll the contact in the appropriate nurture path. - Manual review: If the recommended action is
manual_reviewor the result isunknown, create a review task without marking the lead qualified. - Failure handling: If the state is
failedordeadline_expired, apply the approved retry count, local-time window, and suppression checks before scheduling another attempt.
HubSpot workflows support enrollment criteria, branching actions, and optional re-enrollment. By default, a record enrolls only the first time it meets the trigger, so configure re-enrollment deliberately if one contact can complete several approved calls. HubSpot's workflow setup guide explains enrollment and re-enrollment behavior.
Owner rotation, task actions, marketing enrollment, and subscription controls depend on your HubSpot products and permissions. Confirm each required action in the target account. Keep the routing threshold in HubSpot so sales operations can change it without editing the Dasha agent or either Zap.
Run a controlled end-to-end test
Use a controlled phone number and a non-production contact. Test the contract in this order:
- Submit the HubSpot form once. Confirm Zap 1 resolves the intended Contact ID and produces a stable source event ID.
- Confirm the eligibility filter passes the test record and blocks a suppressed record, a duplicate source event, an invalid phone number, and an out-of-window local time.
- Inspect the resolved Dasha request. Confirm the leading
+survives, the JSON is valid, and no secret appears in the URL or body. - Confirm the API response is HTTP
201, capture itscallId, and verify HubSpot showscall_created. Do not expect qualification fields yet. - Complete the controlled call. Confirm Zap 2 receives
CompletedWebHookPayloadand thatcallAdditionalDatacontains the same Contact ID and source event ID. - Confirm Zap 2 compares both Contact ID and
callIdbefore updating. Verify the typed analysis values and exactcompletedTimeon the contact. - Replay the same completed payload. Confirm the
callId:typekey prevents another applied update or task. - Send a fixture with the correct Contact ID and a different
callId. Confirm the Zap rejects it and alerts without changing the contact. - Exercise
FailedWebHookPayloadandCallDeadLineWebHookPayloadwith controlled webhook tests or fixtures. Confirm each reaches its own path and leaves qualification statusunknown. - Test Zap ownership and shutdown procedures. Verify who owns the Catch Hook URL and how the Dasha agent will be updated before a transfer or disablement.
The contract baseline for this implementation was checked against the current public Dasha and HubSpot schemas, live unauthenticated routes that correctly required authentication, and a local HTTP harness covering 201/Created handling, all three terminal events, correlation, duplicate suppression, and mismatch rejection. It was not an authenticated end-to-end run inside live Dasha, HubSpot, and Zapier vendor accounts. Your controlled account test is therefore required before production traffic.
Monitor delivery and plan for shutdown
Monitor both Zaps separately. Zap 1 proves call creation and call-ID persistence. Zap 2 proves that HubSpot received the terminal business state.
A 200 from the Catch Hook means Zapier accepted the webhook. It does not prove the later HubSpot action succeeded. Alert on Zap 2 action failures and preserve callId, Contact ID, event type, and Zap run ID so an operator can replay the contact update without placing another call.
There are two operational edges to plan for:
- Zapier documents that a disabled or deleted Catch Hook eventually returns
404, after a propagation delay. - Transferring a Catch Hook Zap to another owner changes its URL.
Before disabling or transferring Zap 2, replace the URL on the Dasha agent and account for in-flight calls. Dasha retries server errors and timeouts according to its webhook behavior, while a client error is treated differently. A stale 404 endpoint can therefore discard a result that your CRM still needs.
Troubleshooting
| Symptom | Likely cause | Fix |
|---|---|---|
Dasha API returns 401 or 403 | Missing bearer header, wrong key, inaccessible agent, or wrong domain connection | Check the managed connection, agent access, and blackbox.dasha.ai domain restriction. Rotate any exposed key. |
Dasha API returns 400 | Invalid JSON, malformed E.164 number, or unsupported field value | Inspect the resolved body, preserve the leading +, and remove unmapped placeholders. |
API returns 201 but the contact has no call ID | HubSpot update failed after call creation | Recover with the existing response callId. Do not resend the call request. |
| Form trigger has no Contact ID | Trigger output omits the record identifier | Use Find Contact by verified email, verify the returned email, and stop if no exact contact is found. |
Hook returns 200 but HubSpot is unchanged | Catch Hook accepted the request, then a later Zap step failed | Inspect Zap 2 history and replay the destination update using the same event key. |
| Contact update is rejected by the correlation filter | Stored Contact ID, callId, or source event ID differs | Quarantine the event. Investigate Zap 1 persistence and never fall back to phone matching. |
| HubSpot rejects a dropdown value | A visible label was sent instead of the option's internal value | Map qualified, nurture, sales_call, and other exact internal values. |
| Sales tasks appear twice | Duplicate event passed before the idempotency state was durable, or workflow re-enrollment is too broad | Key on callId:type, narrow re-enrollment, and add an atomic event ledger for side effects. |
| Completed time is wrong | Zap receipt time was mapped instead of Dasha completedTime | Map the event timestamp into the Date and time picker property. |
| Webhooks stop after Zap ownership changes | The Catch Hook URL changed | Update the agent's resultWebhook and test all terminal paths again. |
Automated lead qualification FAQ
Can one Zap wait for the Dasha call to finish?
No. The call-creation request returns when Dasha creates the call record. Use a second Zap triggered by the result webhook for completed, failed, and deadline-expired outcomes.
What if the HubSpot form trigger does not return a Contact ID?
Use Find Contact with the required, verified form email. Continue only when the returned email matches and a Contact ID is present. Carry that ID through additionalData.
Does Dasha sign result webhooks?
Dasha's public documentation does not establish a result-webhook signature. Dasha supports custom result-webhook headers. For stronger authentication than a sensitive Catch Hook URL, place a validating intermediary in front of Zapier.
Where should the qualification threshold live?
Keep the threshold and business actions in HubSpot workflows. Dasha returns typed evidence and a recommended status. HubSpot owns routing, owner assignment, tasks, nurture, retries, and suppression.
Should the Zap store the full transcript in HubSpot?
Only when your access and retention policy requires it. The routing contract needs stable IDs and structured analysis fields. Avoid copying transcript or recording data into broad CRM fields by default.
Build and test your voice agent in Dasha, then connect these two Zaps to one controlled HubSpot form before enabling production traffic.