

Whether you are in B2B or retail sales, you know that speed to lead wins the deals. In some highly competitive industries, such as car insurance, if you haven’t reached out to your prospect within 2 minutes of the form submission, you might as well not reach out at all - your competitors have scooped them up. In this post I will provide you with simple instructions on how to build a basic conversational AI app to illustrate how you can qualify your leads after they submit a form, courtesy of your inbound lead generation efforts.
How do chatbots qualify leads and how to qualify leads with conversational AI?
Chatbots are mainly used as the first line of attack. They can be a huge asset to your business, especially if you are in any B2C space. Here we need to distinguish between chatbot types. There are the chatbots which engage with your customers directly on your website, powered by technologies such as Drift, Hubspot or Liveperson. There also are chatbots which you can deploy to engage with customers directly in the spaces they inhabit - Facebook, Instagram or WhatsApp for example. This keeps the prospect engaged and comfortable.
The chatbot can proceed to qualify the prospect by asking questions and walk them through the purchase process. Generally, this will apply to the more transactional purchases. Larger purchases, such as car insurance or B2B software, will require a more direct engagement with the customer. Customers are used to filling out a form on the website to get the company to touch base with them. Most companies will seek to call the lead back ASAP in order to secure their business or at least disposition.
This is where the problem happens. If you are a small company that gets few leads per day, you cannot afford to have a full time person just to call the leads back within 2 minutes. If you are a large company getting dozens of leads per day, you will have a set of in-house or outsourced call center workers, well instructed in how to qualify leads and ready to call the prospects to ensure your inbound lead generation efforts have not gone to waste. However, with the specificity of this type of lead flow you will find that most of the time your workers either don’t have a call to make or have more calls to make than they can handle. If you hire more callers, they will spend even more time sitting around.
I see you smirking, B2B sales leaders, thinking “WTF does this B2C call center crap have to do with me and my hungry SDR phone warriors, ready to pounce on any inbound lead on a moment’s notice.” Righto. So a year ago Harvard Business Review surveyed over 2,000 B2B and B2C companies. Know what they found?
“37% responded to their lead within an hour, and 16% responded within one to 24 hours, 24% took more than 24 hours—and 23% of the companies never responded at all. The average response time, among companies that responded within 30 days, was 42 hours.” https://hbr.org/2011/03/the-short-life-of-online-sales-leads
In a separate study, HBR found that responding to a lead within the first hour meant a 7x chance to have a meaningful conversation with a decision maker versus responding within 2 hours and 60 times more likely, than responding within 24 hours.
You already automate the emails going out to the newly generated leads (you are, aren’t you?), why not automate the calls, if you can do it at a level indistinguishable from a human being?
Read on for:
- How to prepare to build your app
- How to build your app
- How to test your app
Designing your inbound lead qualification conversational AI app
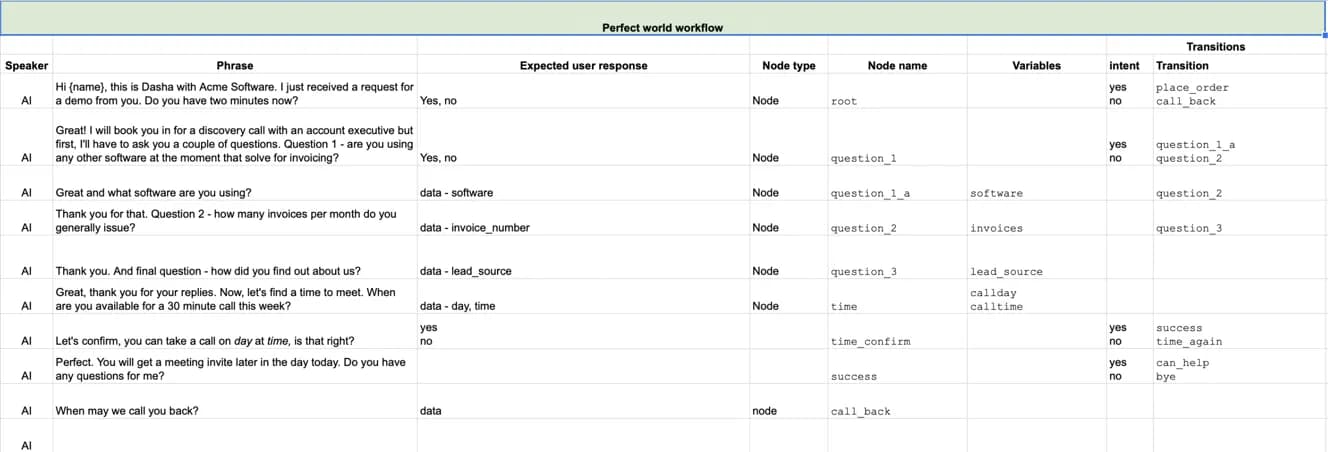
Start off by mapping your conversational app. Here are detailed instructions on how to go about it. Here is the file that was the outcome of my conversation mapping for this super simple qualification script.
The basis of the script is as follows - we’re a company in invoicing software. We get an inbound lead, we call them back, ask if now is a good time to talk, ask 3 qualifying questions, then set a day and time for a call. There are a few digressions (tangents) at play here, to address things such as the prospect asking what the call is about or for a reminder of who called them.
Here is a copy of the file I ended up with as a result of the mapping exercise (instructions above). Do copy to your Google Drive or download as Excel file to make use of it.
The cool thing about the conversational map, is you can go back to it to expand upon the basiс structure of the conversation. And make no mistake, the app I built here (and you will too), in just a couple of hours is quite basic.
How to qualify inbound leads with conversational AI: build your first app
Is this your first rodeo? Then kick it off by reading Angelika’s getting started building conversational apps with Dasha conversational AI guide here.
Now, kick this off by cloning this (simple app)[https://github.com/dasha-samples/dasha-first-app] from our code sample GitHub repo. You can clone directly from your terminal or download, unzip and open the folder in Visual Studio Code.
Now, open up main.dsl and intents.json. These are the two main files that we will be working with in the course of this tutorial.
Let’s get to work by building the key workflow in main.dsl. The ideal workflow is - get confirmation that lead can talk now, ask 3 qualifying questions and book a time to meet.
Here is the workflow in the conversation map:
Take a look at Variables column. Since in the course of this conversation we are asking questions of the user and then storing their responses, we need to use some variables to store the data. We need to start off by initializing these variables.
Open up main.dsl in Visual Studio Code. We need to start off by declaring and initializing the variables.
context
{
   input phone: string;
   input name: string = "";

   software: {[x:string]:string;}[]?=null;
   invoices: {[x:string]:string;}[]?=null;
   lead_source: {[x:string]:string;}[]?=null;
   calltime: {[x:string]:string;}[]?=null;
   callday: {[x:string]:string;}[]?=null;
   callback: {[x:string]:string;}[]?=null;

   visitedNodeTime: boolean = false;
   visitedNodeQuestion1: boolean = false;
}
We’ve got three sets of variables here.
Set 1 - input variables are what you start the conversation off with. In this case, we presume that there is a phone number of the person who left the website form request and their name. You can input these variables as you launch your test call in the Terminal.
Set 2 - variables we will use for storing data collected from the user in the course of the conversation. Note that we are initializing them as arrays because that is the type of data which is collected by the named entity recognition function.
Set 3 - “visited” variables are used to denote a node which has previously been visited by the user. We will use this variable to let the Dasha Platform know to use a different phrase when coming back to the node versus the one we’ve already used.
Now that we have got the variables, let’s begin the conversation.
We start the conversation off with node root - the root node (duh).
start node root
{
   do
   {
       #preparePhrase("greeting", {name:$name});
       #connectSafe($phone);
       // Wait for 5 seconds or until speech is detected.
       #waitForSpeech(5000);
       #sayText("Hi " + $name + " this is Dasha with Acme Software. I just received a request for a demo from you. Do you have two minutes now?");
       wait*;
   }
   transitions
   {
       question_1: goto question_1 on #messageHasIntent("yes");
       call_back: goto call_back on #messageHasIntent("no");
   }
}
Pretty self explanatory. Dasha connects to the user’s phone, waits for 5 seconds, then speaks. Or speaks after it hears the user’s greeting. Dasha asks whether the user has a minute now, and either progresses on our perfect world flow or goes off into the call back node. For now, let’s get through the perfect world flow which means we are successfully qualifying inbound leads.
Node 2 is node question_1. Right, this is the first question we ask.
node question_1
{
   do
   {
       if ($visitedNodeQuestion1==false) #sayText("Great! I will book you in for a discovery call with an account executive but first, I'll have to ask you a couple of questions . Question 1 - are you using any other software at the moment that solve for invoicing?");
       else #sayText("Going back to the question 1 - are you using any other software at the moment that solve for invoicing?");
       set $visitedNodeQuestion1=true;
       wait *;
   wait*;
   }
   transitions
   {
       question_1_a: goto question_1_a on #messageHasIntent("yes");
       question_2: goto question_2 on #messageHasIntent("no");
   }
}
Note that we are making use of the $visitedNodeQuestion1 variable here. Good reason for that - in the course of the conversation you may have to come back to this node, in which case you will want to say something different, not the same thing that you have said previously, amirite? Otherwise it won’t sound realistically human to your user.
Pro tip: there is a better way to solve this with the phrasemap, for the purposes of this tutorial I am using #sayText - a function of main.dsl. I will do a write up on using phrasemap later.
If the user says that they are presently using invoicing software, we are sent to node question_1_a.
node question_1_a
{
   do
   {
       #sayText("Great and what software are you using?");
       wait *;
   }
   transitions
   {
      question_2: goto question_2 on #messageHasData("software");
   }
   onexit
   {
       question_2: do {
       set $software = #messageGetData("software", { value: true })[0]?.value??"";
      }
   }
}
Here you instruct Dasha to ask a question and, upon hearing a response which fits to the instructions provided to it in our data.json file, to go to node question_2.
What instructions are these? These are the named entity recognition training data. Let’s take a look.
{
 "version": "v2",
“entities”:
"software":
   {
     "open_set": true,
     "values": [
       {
         "value": "Xero",
         "synonyms": ["Xero"]
       },
       {
         "value": "Quickbooks",
         "synonyms": ["Quickbooks"]
       },
       {
         "value": "Quicken",
         "synonyms": ["Quicken"]
       },
       {
         "value": "Stripe",
         "synonyms": ["Stripe"]
       },
       {
         "value": "Square",
         "synonyms": ["Square"]
       }
     ],
     "includes": [
       "We use (Quicken)[software]",
       "We mainly use (Stripe)[software]",
       "Just (Quickbooks)[software]",
       "(Square)[software]",
       "(Xero)[software]",
       "(Stripe)[software]",
       "(Quickbooks)[software]",
       "(Square)[software]",
       "(Xero)[software]"
     ]
   },
With this code snippet we provide a set of training data to train Dasha’s Named Entity neural networks in recognizing when the user mentions a software that they are using. Please note that the open_set parameter is set as true this means that if the user names a software which we did not list as part of the training data, it will still be recognized as software and written to our variable $software as per instructions in node question_1_a in main.dsl above. Dasha conversational AI API provides the AI as a service of the platform.
To learn more about Named Entity Recognition and Intent recognition, take a look at Ilya’s posts here and here.
With these code samples you are equipped to write the nodes for node question_2, node question_3, and even. Note that in node time you will need to collect two variables - callday and time. To collect the time, we will use a native function of Dasha called numberword. Here is what it will look like: set $calltime = #messageGetData("numberword", { value: true })[0]?.value??"";
If you have trouble putting these together, here is the application source code to help you along.
Great. Now that we’ve collected all the data, let’s make sure that we got the call time correctly.
node time_confirm
{
   do
   {
       #sayText("Perfect. Let's confirm, you can take a call on " + $callday + " at " +$calltime + " is that right?");
       wait *;
   }
    transitions
   {
       correct: goto success on #messageHasIntent("yes");
       incorrect: goto time on #messageHasIntent("no");
   }
}
Here Dasha will read out the results to the user. If the user confirms, we got to node success, if the user does not confirm, we go back to node time.
Success is pretty straightforward (in the context of DashaScript). I’ll still list it here so that you can reuse it to close the conversation in other points (e.g. node bye).
node success
{
   do
   {
       #sayText("Perfect. You will have an invite later today. Thank you so much! We'll speak soon! Bye!");
       exit;
   }
}
Alright. So we got through the perfect world workflow and your conversational AI app is midway done.
Now, let’s address the workflow where the user says they can’t talk right now and asks to call them back. We need to instruct Dasha to ask when to call the user back and to collect the user’s response.
Here is how this code will look like in DSL:
node call_back
{
   do
   {
       #sayText("No worries, when may we call you back?");
       wait *;
   }
   transitions
   {
      callback_confirm: goto callback_confirm on #messageHasData("callback");
   }
   onexit
   {
       callback_confirm: do
       {
       set $callback = #messageGetData("callback", { value: true })[0]?.value??"";
       }
   }
}
Here are the training data I put together for the purpose of identifying callback:
     "callback":
     {
       "open_set": false,
       "values": [
         {
           "value": "tomorrow",
           "synonyms": ["tomorrow", "next day"]
         },
         {
           "value": "tomorrow at the same time",
           "synonyms": ["same time tomorrow", "tomorrow same time"]
         },
         {
           "value": "the day after tomorrow",
           "synonyms": ["In two days", "Day after tomorrow"]
         },
         {
           "value": "in an hour",
           "synonyms": ["in an hour", "in two hours"]
         },
         {
           "value": "later today",
           "synonyms": ["later today"]
         }
       ],
      "includes": [
         "call me back at (tomorrow)[callback]",
         "(tomorrow)[callback]",
         "(the day after tomorrow)[callback]",
         "(tomorrow)[callback] is fine"
       ],
I will let you write the confirmation node on your own - you can reuse some of the code we used for node time_confirm and success earlier.
Use digressions to add human-like realism to the conversation
Digressions. You should have noticed them in the conversation map:

The purpose of digressions is to account for the unpredictable human behavior. At any point in time a person you are talking to might ask about the weather or a million other things. Digressions are how you prepare your AI app to handle these seemingly random requests. More on digressions you can find in this post. The cool thing is - you can predict some or maybe even most digressions but not all of them. You get to find out what all the ones you did not predict are in live conversations that your AI app has with real human beings, once you begin training it. More on that later.
Digressions are activated by intents. Just like you defined named entities in data.json, you define intents in the same file.
 "intents":
{
   "who_call":
   {
     "includes": [
       "who is this again?",
       "who is calling?",
       "what is this about?",
       "who are you?"
     ]
     },
   "what_do": {
     "includes": [
       "what does your company do?",
       "what company is this again?",
       "what do you do?"
     ]
}
And so on.
Here is how the digressions for these intents look like:
digression who_call
{
   conditions {on #messageHasIntent("who_call");}
   do
   {
       #sayText("This is Dasha with Acme Software. You reached out to us a few minutes ago on our website.");
       return;
   }
}

digression what_do
{
   conditions {on #messageHasIntent("what_do");}
   do
   {
       #sayText("Acme Software provides invoicing software as a service for SMB. ");
       return;
   }
}
What happens here is simple - the user calls up a digression at any place in the conversation, Dasha responds, and goes back to the node from which the digression was called. Equipped with this code, you can construct the other digressions as well.
And really that’s it.
launching and testing your inbound lead qualification conversational AI app
Once you get through putting together the rest of the app, you will end up with code that is similar to what you’ll find in this repository.
To run a test conversation, type into your terminal
npm i
And then
npm start chat Jane where Jane is any name you want to give your user. This will launch a text chat. To launch a voice call, type:
npm start 12223334455 Jane where 12223334455 is any phone number in the international format without the + symbol.
Congats. You’ve got the base from which you can build your super fly inbound lead qualification app. In the next installment we’ll talk about connecting this application to external services to initiate calls and to store collected data.
You can access the full application source code to get you started.
Stay tuned.