
Whether you need to drown out extraneous noise in recorded speech, get rid of echoes, or simply separate the voice from the music, this guide can be very helpful to you. It's okay if you've never worked with Speech Enhancement models and Denoising tools - I’m here to describe all the steps and provide you with a couple of valuable tips.
Note that the methods described below only allow you to drown out background noises, music or to carry out dereverberation. They will not make the speaker's speech more intelligible and will not increase the real bitrate of audio recordings.
Small number of files, stationary noise
Let's consider the simplest case - you have a small number of audio files containing some unnecessary stationary noises in addition to the useful speech signal. In this case, the problem can be solved very simply - you can use the Noisereduce library for Python. Note that this method assumes that for each audio you need to specify a section containing a sample of unwanted noise sound. For example, it can be a pause between words or the first second of the recording. It's also worth mentioning that you can work in a similar way in SoX, but if your files are short enough (just a few seconds long), you are very likely to get a strong echo in the resulting audio.
You can install the tool via pip:
pip install noisereduce
The process of using the library can be described in just a few lines:
import noisereduce as nr
import soundfile as sf

# load data
data, rate = sf.read("noisy.wav")
# select section of data that is noise
noise_len = 2 # seconds
noisy_part = data[:rate*noise_len]
# perform noise reduction
# you can tune prop_decrease parameter
reduced_noise = nr.reduce_noise(audio_clip=data, noise_clip=noisy_part, verbose=False, prop_decrease=0.8)
# save denoised audio
sf.write("clean.wav", reduced_noise, rate)
Unfortunately, this method is not suitable for a large number of files, because then the need to search for intervals with noise becomes a noticeable problem. Also, Noisereduce will not allow you to get rid of non-stationary noise qualitatively. Therefore, we will move on to the next tool, which is designed for more complex situations.
Lots of files, non-stationary noise - the easy way
This method is suitable for those who do not have a relatively new video card and an extra terabyte on the drive, or simply want to save their time and do not want to train their model.
Thanks to the Deep Noise Suppression Challenge, the direction, which is not the most popular in the ML community, is becoming more widespread and accessible for ordinary researchers: the authors have prepared a large amount of data and scripts for generating datasets, and have proposed their own baseline model.
DNS Challenge has its own repository on Github, which we will actively use. The repository contains the open base version of the NSNet2 noise reduction model in ONNX format and the scripts required to use it in practice. That is, you are not faced with the problem of generating a dataset, selecting hyperparameters and training a neural network, so this method is fast and simple from a practical point of view. It should be noted that NSNet2 is based on a fairly simple architecture (3 GRU layers and a fully connected output layer), so you pay for the speed and ease of use with the quality of noise reduction. More details about NSNet2 can be found in this article.
Let's move on to describing the data cleansing process using an open model: First, install the required packages:
pip install pysoundfile
pip install onnxruntime
Clone the repository and go to DNS-Challenge / NSNet2-baseline. To clear an audio file or directory, run the following command:
python3 run_nsnet2.py --input input_dir_or_wav --output output_dir_or_wav
The script works both with directories and with individual audio files. All files must be in wav format and have a sampling rate of 16kHz. Note that the script may not work well with long audio files (over 4 minutes long). It is better to divide them into several shorter ones.
Lots of files, non-stationary noise - a more complicated method
If the results obtained with the open NSNet2 didn’t satisfy you (for example, along with the noise, the model partially masks the voice, or some noises are still loud enough), then you can turn to a new tool - Asteroid: Install Asteroid:
git clone https://github.com/asteroid-team/asteroid
cd asteroid
pip install -e .
The framework contains a recipe for training NSNet2 we are already familiar with. Of course, you can train your own version of the previously used network, but these scripts (after some modifications) will allow you to train DCCRN, a more complex model that better copes with the tasks of noise reduction and dereverberation (if you wish, you can do your research: train two networks and conduct their comparison). You can read more about DCCRN in the this article.
This time we go all the way, from preparing a dataset for training a neural network to cleaning your data with it. First, let's change the scripts to use DCCRN instead of the base model:
Import DCCRN inside model.py:
from asteroid.models import DCCRNet
Let's turn the make_model_and_optimizer function into model.py:
def make_model_and_optimizer(conf):
    model = DCCRNet(stft_kernel_size=512, sample_rate=16000.0, stfr_stride=256, architecture="DCCRN-CL")
    # Define optimizer of this model
    optimizer = make_optimizer(model.parameters(), **conf["optim"])
    return model, optimizer
Now let’s make the following changes in the model.py:
class SimpleSystem(System):
    def common_step(self, batch, batch_nb, train):
        mixture, speech, noise = batch
        estimate = self(mixture.unsqueeze(1))
        speech = self(speech.unsqueeze(1))
        loss = self.loss_func(estimate, speech)
        return loss

def distance(estimate,  target, is_complex=True):
    target = target.unsqueeze(1)
    return torch.nn.functional.l1_loss(estimate, target, reduction='main')
There is one problem left to solve. The DCCRNet class inside asteroid/models/dccrnet.py doesn’t have a definition for the denoise method, which is required to use run.sh. It needs to be added (it is extremely simple):
def denoise(self,x):
    return self.forward_wav(x)
It is recommended to change loss in train.py. We import the necessary modules and change the line with the `loss_func:
from asteroid.losses import PITLossWrapper
from asteroid.losses.sdr import SingleSrcNegSDR

loss_func = PITLossWrapper(SingleSrcNegSDR("sisdr"), pit_from="pw_pt")
Now we use SI-SDR as a loss function (instead of the standard MSE). The pros of SI-SDR are described in this article.
Next, we will indicate the directory in which we’ll store the full version of the DNS Challenge repository. Paste the desired path into storage_dir inside run.sh. Please note that you need a lot of free space on this disk (about 320GB to get started), later the directory can take up to 900GB.
Now you can run run.sh. I recommend adding exit 1 to line 45 and running the script in the background, as downloading and processing will take a long time (it took me about a day, so it depends on your connection speed). Exiting right after stage 0 allows you not to switch to generating a dataset with standard parameters immediately after the download is complete. After the script finishes, line 45 needs to be cleared.
After the download is complete, go to the config file noisyspeech_synthesizer.cfg inside the downloaded repository. The parameters described in it allow you to control the characteristics of the future dataset. The most important are sampling_rate, audio_length (the length of each future audio in seconds, it is better to reduce it to 3-10 seconds), total_hours (it is better to put 400-600 hours), snr_lower and snr_upper (specify the intervals for the noisiness of the dataset, though you can leave the default values). The variables use_singing_data, use_emotion_data, use_mandarin_data allow you to control the use of singing data, data originally collected for Emotion Recognition, and data in Mandarin, respectively.
The downloaded data is comprised of a lot of clean recordings in different languages and a lot of audio files with different noises. The next step is to generate noisy files. Noises of varying volume are superimposed on clear speech. After editing noisyspeech_synthesizer.cfg, run run.sh with stage = 1. After that, the synthesis of the dataset will begin.
Synthesizing new audio in single-threaded mode is a long process, especially if you are generating a large number of short recordings. This procedure can be accelerated. The dataset can be generated in parts in several threads by specifying the indices of the next subset of future noisy files through fileindex_start and fileindex_end in noisyspeech_synthesizer.cfg. That is, you can simply run run.sh with stage = 1 several times, changing the index values (don’t forget to add exit 1 again, this time after the generation stage as it will prevent you from going to training immediately after synthesis).
After all the data has been generated, run run.sh again with stage = 2. Don't forget to add CUDA_VISIBLE_DEVICES when calling. After creating a json with data for each noisy audio, we will move on to stage 3 - training DCCRN. Before you do that, you should edit local / conf.yml at your discretion. You can change the number of epochs, learning rate, enable or disable early stopping. If you don't have enough video memory, reduce the batch size in the same file. Reducing the length of the generated audio files (for example, to 3 seconds) also helps to use less video memory. For example, with an audio length of 10 seconds and batch_size = 24, slightly less than 30GB was used.
For quick experiments and shorter epochs, it is worth reducing the limit_train_batches inside the train.py. This way you can use a random subset of the training sample for each epoch. If SI-SDR loss takes values around 17.5 - 18 on validation, then the model has been already trained quite well.
After learning, go to stage = 5 and feed your noisy directory with --denoise_path. The results will be saved inside the experiment directory. To use a video card on inference, specify --use_gpu 1. After finishing the processing, listen to the new audio files and compare them with the original.
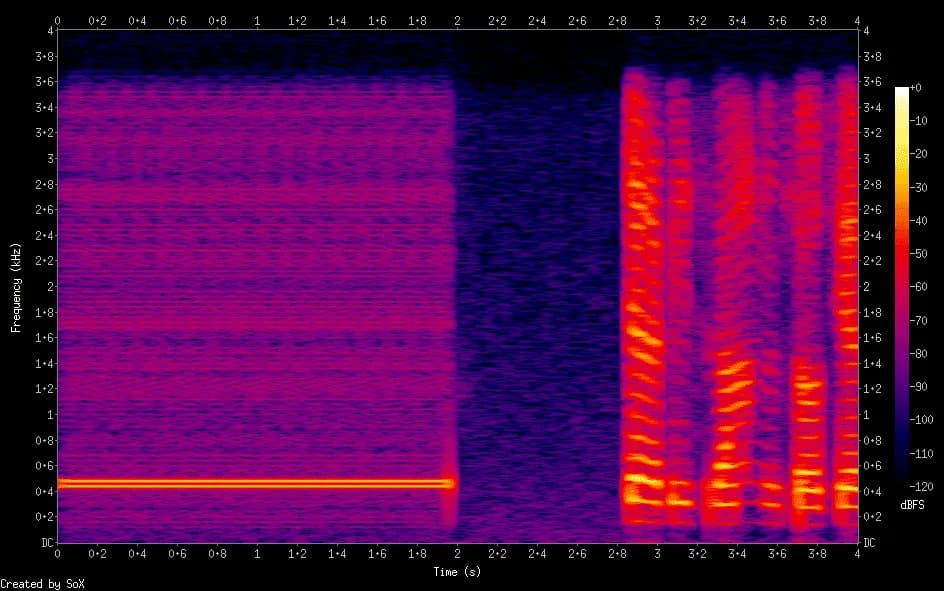
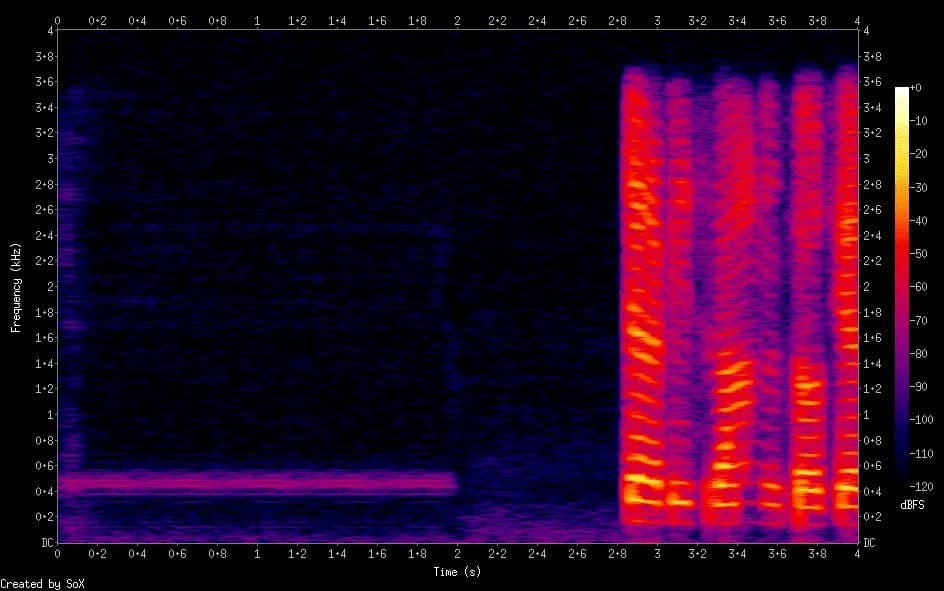
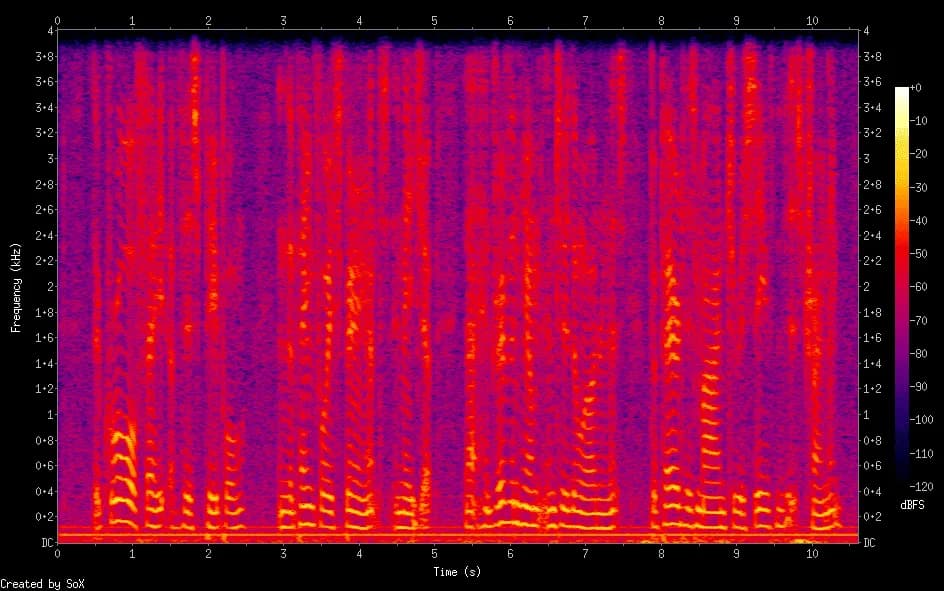
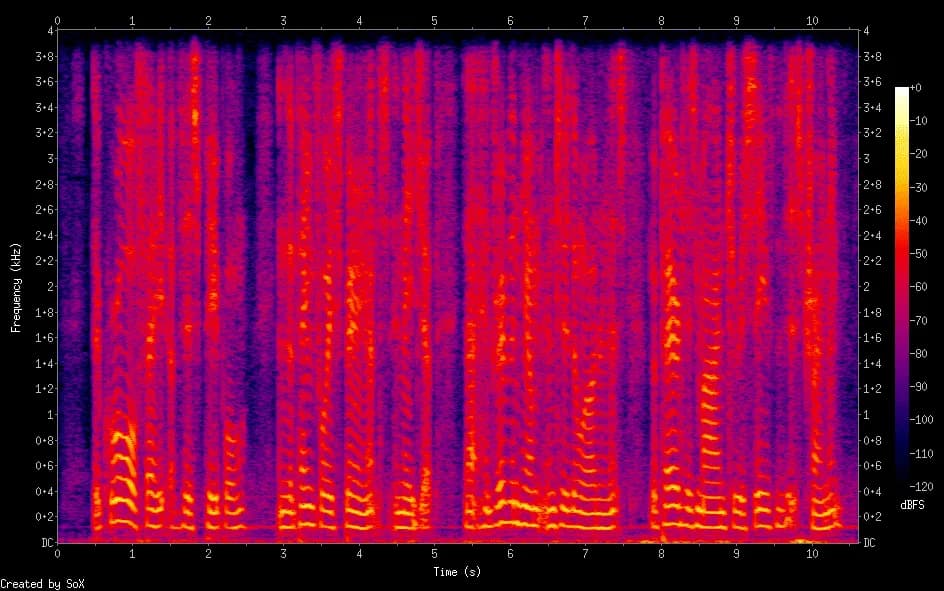
Let's consider examples of spectrograms before and after processing using DCCRN.
Removing ringtone sound and background noise:
Removing low frequency hum and background noise:
Conclusion
We've looked at three different ways that you can remove extraneous noise from audio files. They differ not only in the required amount of time and computing resources, but also in the quality of noise reduction. The latter method may be of interest to those who wish to get acquainted with Speech Enhancement and try out a new instrument. The first two methods are more relevant for those who just want to achieve the desired result quickly, without diving into the peculiarities of learning the DCCRN network from scratch.