NEW Try Zapier integration to connect Dasha instantly to thousands of the most popular apps!
Taking voice payments using Stripe and Dasha AI
Arthur Grishkevich, Citizen Developer Advocate
8 minutes
Stripe + Dasha
Dasha is a conversational AI Studio and API. Developers use Dasha to quickly build compelling automated conversational experiences. Dasha apps conduct conversations via the phone or in-browser. Today we’ll show you how to use Dasha to accept payments with voice - over the phone or in-browser.
Taking voice payments using Stripe and Dasha AI
Dasha is a conversational AI Studio and API. Developers use Dasha to quickly build compelling automated conversational experiences. Dasha apps conduct conversations via the phone or in-browser.
Today we’ll show you how to use Dasha to accept payments with voice - over the phone or in-browser.
Why would you use this in-browser in a web app? The most obvious reason is to help visually-impaired users with their purchases. Or you could provide an ongoing shoppers’ conversational assistant to enhance your users’ experience. Aside from simply taking payments, you can build a full voice support bot with Dasha.
Dasha basics
There are 3 parts to the Dasha platform:
Dasha Studio - is a VSCode extension. It lets you build, train, manage and deploy Dasha applications. Dasha apps are written using DSL - DashaScripting language. DSL is based on TypeScript and was designed specifically to support the development of human-like conversations.
Dasha Cloud - provides conversational AI as a service. This means that you don’t need to be a data scientist to use machine learning when building Dasha conversational apps.
Dasha SDK - is an abstraction layer that lets you connect your locally stored conversational application (created in the Studio) to the Dasha Cloud for execution.It is a programmable Node.js interface. The SDK also realizes functions which get called up from DSL and executes them locally on the machine running the application.
Now, make sure you have the latest Microsoft Visual Studio Code, Node.js and NPM installed. Dasha Studio is implemented as an extension to VSCode.
If you have never used Dasha before, you need to install Dasha Studio and command line interface and activate your API key.
code --install-extension dasha-ai.dashastudio &&
npm i -g "@dasha.ai/cli@latest"
Now, register your Dasha API key. You will need to sign up for an account in the browser window which pops up:
dasha account login
Afterwards, run this command to check your API key:
dasha account info
Great. Now, you need to clone this repository and open the folder
cd stripe-dasha-integration &&
code .
Note - you might need to navigate to command palette (F1 or ⇧+⌘+P on Mac) and search for ‘Shell Command: Install ‘code’ command in PATHin order to usecode` commands in terminal.
You can use the sample code you have cloned to take orders and payments over the phone. You can also build additional conversational flows to support your users. You can take a look at some of the other use case on the YouTube channel.
The Dasha-Stripe integration
Application architecture
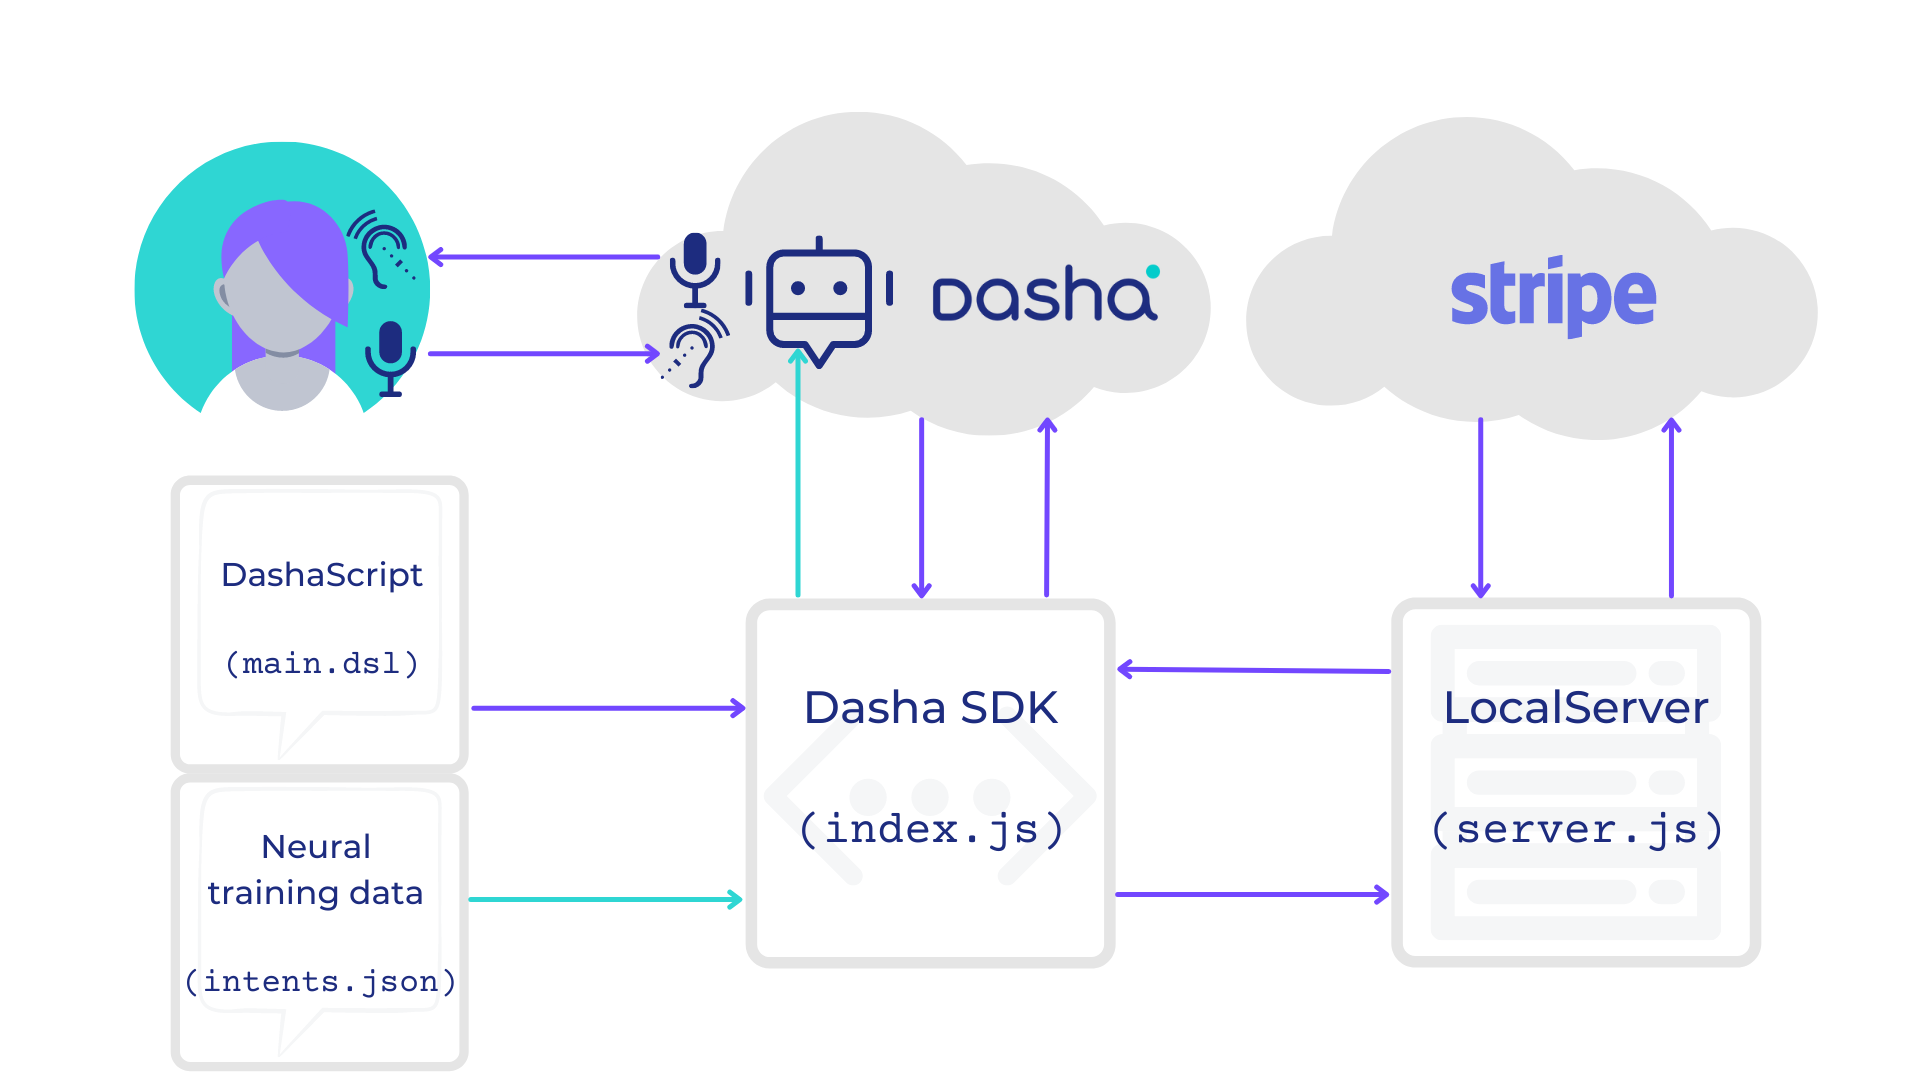
Here is how the architecture of the app you just cloned is structured.
The entire logic of Stripe communication is handled by the server (server.js). Dasha acts like a collector and processor of data to be used by the server. The collected data is sent to the server, the server returns Stripe responses that are used to communicate with the user. This enables us to have voice interactions between the user and Stripe.
First, Dasha confirms the item the user seeks to purchase. The user gives the item id (a number) he wants to buy. Then the application collects... the user’s address to calculate shipping costs and taxes. As soon as shipping costs and taxes are calculated, and the user confirms their intent to buy, payment intent is created in Stripe. After that, Dasha collects the user’s card details and conducts payment.
Before you begin
This guide assumes that you have products created in your Stripe account (or testing sandbox). If you do not, please do so now. Note that application expectes the item ids to be numbers.
Please store your Stripe API keys and Port number for LocalServer in a ‘.env’ file in the root directory. Note that these api keys should be testing (sandbox) api keys to avoid performing real transactions. You can use the following format for .env. The default value for PORT is 8080, you may override it if you like in your file:
These are the three main files you will work with in any Dasha app:
main.dsl - this is the DashaScript file. DashaScript is a domain specific language based on Typescript that is used to design human-like conversations.
index.js - this is your Node.js file where you import the Dasha SDK. The SDK is used to launch your Dasha app (contents of the /app folder) to the Dasha Cloud, where the conversation is executed.
data.json - is the dataset used to train the neural network powering your AI app (in the
cloud). Here you can specify data to train intents and to train named entities.
app.dashaapp - is your config. You specify which files are used for which purpose in your Dasha app and give your app a name.
And in the app we are building, you will also work with the file called server.js. We are using it as a mock server in place of the one you would use to communicate with Stripe.
Building your integration
Before you start testing, let’s take a look at what is happening in all these files to make the Dasha-Stripe integration work. First, open up main.dsl.
We start off by importing two libraries - the first is common phrases, ways in which users interact with AI, the other is a library of types we built specifically for this application. It is used for the objects used in context lines 4-17.
Also pay attention to line 7 - we are declaring an input variable phone - this is the variable used to connect to a voice channel endpoint, whether it be telephone or in-browser web rtc.
In the lines following (19-28), we declare external functions. External functions let you call out to the Node.js file index.js right from the DashaScript main.dsl file. In Node.js you can write out methods to communicate with external APIs. In this case, we are communicating with the LocalServer API which in turn talks to the Stripe API. We declare external functions here to use them throughout the body of the application below.
Next, you’ll see start node root. This is the node that begins the conversation.
A DashaScript file is a series of states - most of which denote interactions between AI and user. There are two types of states - all nodes have to have a state lead into them directly with a transition while digressions can be called up at any point in the conversation when a specific condition is identified by the neural network.
The first state is always a node and labeled by the prefix start. In this node, Dasha asks what the user needs help with and waits for a response. Note that no transitions are specified in this node. That means that the conversation can only move forward through the use of a digression.
There are three logical areas in a state. The first is do - where actions by Dasha are written out, transitions for instructions on which node to go to next based on conditions being met and onexit allowing you to take specific actions when a specific transition is activated.
startnoderoot{do { //actions executed in this node#connectSafe($phone); #waitForSpeech(1000); #sayText("Hi there. Dasha on the line, how may I help you today?");wait *; // wait for a response }transitions { }}
For the purpose of this app, we are not building a complex menu, there is just one option - the user needs help placing their order which for some reason they could not do on the website. Once the AI identifies intentpayment_phone, this digression is called into play. The thing to remember about digressions is they can become active whenever their condition is met.
Now is a good time to take a look at intents.json. As you recall, this file is where you provide intent and named entity data to train the neural networks in the Dasha Cloud. If you look at line 57, that is where the intent data for payment_phone begins:
"payment_phone": {"includes": ["I wanted to pay for a jacket and I can't do it online on the website","pay for a jacket and I can't do it online on the website","I can't pay for my order on the website","I need help paying for my order on the website","I can't pay on the website","I want to pay for my order" ] },
So, once the AI identifies the intent payment_phone in the user’s speech, digression payment_phone gets called up. Here, the AI asks the user what the item number is and then listens for the item number in the user’s reply, as specified in transitions.
digressionpayment_phone {conditions { on#messageHasIntent("payment_phone"); }do {#sayText("Yeah, sure thing I'd be glad to help.");#sayText("Could you tell me the item number please?");wait*; }transitions {product_number: gotoproduct_numberon#messageHasData("numberword"); }}
Once item number is identified, we progress to the next node. Here things get interesting. We need to take the item number and run it by Stripe API via LocalServer to confirm it exists and to return its cost to the user. We use #messageGetData to store data collected from the user’s reply and then reach out to the specified function in index.js by using the external function get_product. The function in index.js in turn reaches out to our LocalServer, in the file server.js.
In this node, we also do a bit of conditional logic and calculations to output the exact price in dollars and cents. Dasha asks the user to confirm and goes to node ask_address on positive intent and node invalid_product on negative intent.
nodeproduct_number {do {#sayText("Alright, let me check.");varparsed_product_id = #messageGetData("numberword")[0]?.value;#log(parsed_product_id);set$chosen_product_info = externalget_product(parsed_product_id);#log($chosen_product_info);if ($chosen_product_infoisnull) {externalthrow_error("Unexpected error: chosen_product_info is null"); }else {vardollars = ($chosen_product_info.price / 100).trunc().toString();varcents = ($chosen_product_info.price % 100).toString();#sayText("So the " + $chosen_product_info.description + " for " + dollars + " dollars and " + cents + " cents. Is that right?"); }wait*; }transitions {ask_address: gotoask_addresson#messageHasIntent("yes");no: gotoinvalid_producton#messageHasIntent("no"); }}
But before we can do the calculations and ask the user to confirm, we need to call the Stripe API to return the price of the product to us. As you can see in line 70, we are calling on the external function get_product. Let’s look at this function in the file index.js at line 49. As you can see, we store the argument and pass it to the LocalServer while waiting for a response.
Now, have a look at server.js, to see what happens to our argument. Open server.js and look at lines 72-106. Here we are calling out to the Stripe API with the product ID and storing the data as an object to be returned to the LocalServer, which in turn returns the object to the Dasha SDK running in our index.js file via the Dasha Cloud.
app.get("/api/product_info/:product_id", async (req, res) => {constproduct_id = req.params.product_id;try {console.log(`Searching information about the product ${product_id}...`);constproducts = awaitstripe.products.list({ids: [product_id], });if (products.data.length == 0)returnres.status(404).send(`Product '${product_id}' not found`);constdescription = products.data[0].description;constprices = awaitstripe.prices.list({product:product_id, });if (products.data.length == 0)returnres .status(404) .send(`Prices for product '${product_id}' not found`);constprice = prices.data[0].unit_amount;constproduct_info = {product_id,description,price, };console.log(`Found product info ${JSON.stringify(product_info)}`);returnres.json(product_info); } catch (e) {console.log(`Error: ${e.message}`);returnres.status(400).send({ message:e.message }); } });
Note that server.js requires your Stripe Secret Key and Stripe Publishable Key which you should have stored in the .env file (see format example above).
In the node product_number we just looked at, the transitions are specified in lines 84 and 85 of main.dsl. If the user confirms the item price, we go to the next node which is ask_address. As you can guess, in this node Dasha asks the user for their address. Once the data is identified, in the next node validate_address we again use an external function to ship the data to the mock server and return value on shipping costs. Once data is returned, Dasha reads the address back to the user and asks them to confirm it. You can see this in line 120.
If the user confirms, conversation moves to node validate_price, as specified in the transitionvalidate_price (line 126). In this node Dasha reads the full price, inclusive of shipping costs and tax out to the user and asks for user’s confirmation of purchase intent. If the user confirms (line 165), the conversation progresses to node init_payment.
Here we use the external function init_payment to create payment intent in Stripe via our mock local server. If this operation succeeds, the conversation progresses to node ask_card_number. Now, the actual payment flow begins. We ask for the card number, in the next node confirm the number with the user. Then Dasha collects the expiration date and confirms it with the user; then the CVC code, and validates it via Stripe.
Finally, Dasha asks the user for confirmation of intent to purchase and, having received it, processes the transaction.
You can easily follow along in your code which is why I did not include code samples here for the above.
There is one additional digression of note at line 353 digression order_delivery. It is activated when the user asks when their product will be delivered. Dasha replies with how many days it will take to receive the item and on which day of the week it will arrive.
Running your app
To run this app, open two terminals in your development environment. I use VSCode and here is what mine looks like:
First off, run npm i to install dependent packages. Make sure you have created a .env file with your Stripe API Keys (as above). In one of the terminals run the mock local server:
node server.js
In the other you can run a chat conversation :
npm start chat
Or a voice conversation:
npm start 12223334455
Where 12223334455 is your phone number in international format (starting with the country code!)
If you want to integrate Dasha into a web application, use code from this repo. There is also a detailed video tutorial on the subject.
Enjoy your conversation and be sure to join our developer community where you can always get help from Dasha core devs and other conversational AI developers.