

Folks who work in insurance will tell you that it’s about as far from a sexy industry as one can get. Call me narrow-minded but I think any industry can be made sexier with a bit of AI. In today’s tutorial we will do just that: build a conversational AI app that will take a customer’s call, check their policy number and answer a few questions.
Pre-start
If this is your first time building a conversational AI app with Dasha, you want to join our developer community. This is where you will find all the answers to all of your questions (42). Also, as we are in a closed developer beta right now, this is where we will give you your API key to use Dasha.
This is the app you will build today: Embedded content: https://youtu.be/46nyWBTSHgs
To begin building with Dasha you will need to have Visual Studio Code, NPM and Node.js installed, ideally in their latest versions. Now do the following:
- Install the Dasha Studio VSCode extension
- Open the terminal in VSCode and install Dasha command line interface npm i -g "@dasha.ai/cli"
- Now, run the command dasha account login and follow the browser prompt when it pops up.
Conversation structure
In order for you to better understand the conversation flow of what we are building, here is the basic structure of the conversational AI app.
Perfect world conversation
The user/customer calls in and asks to confirm some information about the insurance policy.
The AI asks for their policy number. The AI then reads the policy number back out to the user to confirm it. If the number is confirmed, Dasha looks up account details. If such an account exists, it tells the user as much and asks what they are after. If no such account exists, it tells the user as much.
The user may then proceed to ask one of a number of questions, such as, “does my policy cover accidents” or “what is the status of my claim”.
That’s pretty much it. Sounds simple enough. Before we get to the app, let’s go over the Dasha AI Platform architecture.
Dasha AI Platform architecture
There are three main parts to the product which makes building, training, developing and maintaining your human-like conversational apps possible. They are - Dasha Studio, Dasha SDK and Dasha Platform.
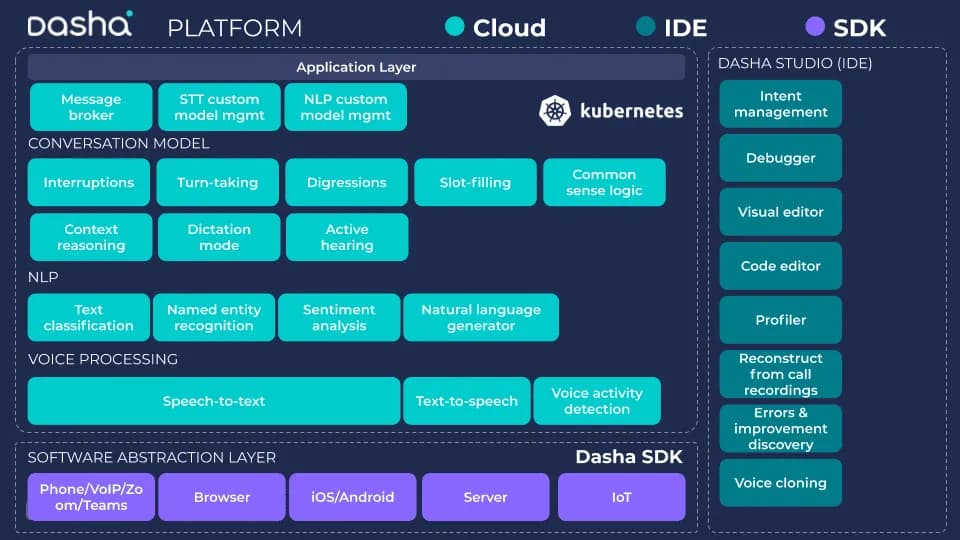
Dasha Studio
Is an extension to VSCode. You use the Studio to create your conversational workflow, provide data to train the neural networks to recognize intents, define ways in which the AI is to respond to the user, as it is talking to the user. The Studio lets you create these apps using DashaScript, an event-driven, domain-specific language derived from TypeScript. In essence, DashaScript is a collection of commands which tell the AI services in the Dasha Cloud Platform how to behave in various situations.
Dasha SDK
Is a library used to integrate your applications or services to the Dasha Cloud. It uses GRPC for two way communication between your application and Dasha Cloud Platform
Dasha Cloud Platform
The Dasha Cloud is where the magic happens. It provides the AI-as-a-Service components which enable you to create apps that are wildly human-like in the way they interact with users. Best in class speech to text, text to speech, natural language processing, understanding and generation, all come as a service of the Dasha Platform. And we are constantly improving existing services and building new ones. With any application you build using our technology, you will have access to all the newest updates. For more details on the Cloud Platform’s services, peek here.
The insurance customer service conversational AI app
Go ahead and open the source code to the application in your VSCode. You can either clone and open the app in your terminal or download, unzip and open the folder in VSCode using File > Open.
You will now want to open four files. These are essentially what make your conversational AI app built with Dasha possible.
index.js
This is the Node.js file from which your conversational AI application is launched. You use index.js to load the Dasha SDK. By the same token, you can incorporate this file, or the code which launches your application into any other Node.js project, from whence you wish to make use of the Dasha Cloud to run conversational apps. In this case, you will obviously need to include the Dasha application code in a separate folder.
Below is the JavaScript code you would use to launch a basic Dasha SDK connection and Dasha app:
const dasha = require("@dasha.ai/sdk");
const fs = require("fs");
async function main()
{
  const app = await dasha.deploy("./app");

  app.connectionProvider = async (conv) =>
    conv.input.phone === "chat"
      ? dasha.chat.connect(await dasha.chat.createConsoleChat())
      : dasha.sip.connect(new dasha.sip.Endpoint("default"));

  app.ttsDispatcher = () => "dasha";

  await app.start();

  const conv = app.createConversation({ phone: process.argv[2] ?? "", name: process.argv[3] ?? "" });

  if (conv.input.phone !== "chat") conv.on("transcription", console.log);

  const logFile = await fs.promises.open("./log.txt", "w");
  await logFile.appendFile("#".repeat(100) + "\n");

  conv.on("transcription", async (entry) => {
    await logFile.appendFile(`${entry.speaker}: ${entry.text}\n`);
  });

  conv.on("debugLog", async (event) => {
    if (event?.msg?.msgId === "RecognizedSpeechMessage") {
      const logEntry = event?.msg?.results[0]?.facts;
      await logFile.appendFile(JSON.stringify(logEntry, undefined, 2) + "\n");
    }
  });

  const result = await conv.execute();

  console.log(result.output);

  await app.stop();
  app.dispose();

  await logFile.close();
}

main().catch(() => {});
main.dsl
Main.dsl is located in the /app/ directory. This is the DashaScript file which gets compiled and executed in the Dasha Cloud Platform. This file contains all the instructions that you provide to the Dasha AI Cloud on how to run your application. In essence, this is the conversational structure.
data.json
Data.json is the super-power file. It gives you the super power of training neural networks with simple JSON datasets. It is used for two things mainly - to define intents - ways of helping the AI to understand what real meaning the user places into their replies and named entities - data points located within the user’s replies. You can read more about both functions at the links above.
phrasemap.json
Phrasemap.json is another superpower file. Here you instruct what phrases your AI app should use in responding to the user. You can also instruct it to vary the phrases, to say different things if the same node gets called up a second or third time, etc.
Understanding the conversational AI app
Now that we’ve got a high-level overview of the technology and the files you are working with, let’s look at main.dsl more closely.
Run a test
To start off, let’s launch a test conversation. To do so, you will need to have the code open in your VSCode. Run npm i. Now, run npm start chat. A chat session will launch in your terminal. You can also run npm start 12223334455 where 12223334455 is your phone number in international format. You will get a call from the AI and can talk to it.
Now, let’s look at the code.
Imports and declarations
We start off by importing the library of commonly used digressions, intents, etc. By the way, digressions are nodes that can be called up at any point in the conversation. They do not have a node leading into them. Digressions are great for two things. One is preparing your AI appfor a variety of tangents which a human user might bring up in the course of a conversation. Two is letting you teach your AI app to say something along the lines of “how can I help you today” and then listen in for a response. You can read more about digressions here.
Then we declare context variables - input (ones that are pushed to the app on conversation start) and storage ones. Following this, we declare external functions.
External functions are a way to pass and receive arguments to and from the index.js file, in which the Dasha app runs as a function. You can in turn write instructions on what to do with these arguments, for example, calculations or, more importantly, you can push data to or pull data from an external service from the Node.js file. Or both. In the app you are looking at now we make use of external functions and will go over it.
I will paste examples of code. Unfortunately, due to the nature of Dasha apps, these code snippets do not pass the copy-paste test, as they need multiple files to run. As you have opened the repo, you can run the entire code base.
import "commonReactions/all.dsl";

context
{
    // declare input variables here
    input phone: string;

    // declare storage variables here
    name: string = "";
    policy_number: string = "";
    policy_read: string = "";
    policy_status: string = "";
    rating: string = "";
    feedback: string = "";
    claim: string = "";
}

// declare external functions here
external function check_policy(policy_number: string): string;
external function convert_policy(policy_number: string): string;
Conversation flow
The conversation starts in earnest with line 22.
We kick it off with a starting node named root. Once the connection is established, the AI says the __”greeting”__ phrase, as indicated in the phrasemap.json. In the greeting phrase it asks for a name. Upon finding the data name, as defined in data.json, the conversation moves to the next node. In node node_2, we store the collected name data in the previously defined storage variable name and then use it to greet the user by their name.
start node root
{
   do //actions executed in this node
   {
       #connectSafe($phone); // connecting to the phone number which is specified in index.js that it can also be in-terminal text chat
       #waitForSpeech(1000); // give the person a second to start speaking
       #say("greeting"); // and greet them. Refer to phrasemap.json > "greeting"
       wait *; // wait for a response
   }
   transitions // specifies to which nodes the conversation goes from here
   {
       node_2: goto node_2 on #messageHasData("name"); // when Dasha identifies that the user's phrase contains "name" data, as specified in the named entities section of data.json, a transfer to node node_2 happens
   }
}

node node_2
{
   do
   {
       set $name =  #messageGetData("name")[0]?.value??""; //assign variable $name with the value extracted from the user's previous statement
       #log($name);
       #say("pleased_meet", {name: $name} );
       wait*;
   }
}
Now, please refer to phrasemap.json to see how the phrases are defined. You can see that we provide an alternate phrase under the label ”repeat”. This lets Dasha know that if it comes back to the same node a second time, a different phrase must be used. Note the use of dynamic variables in node node_2 and ”pleased_meet” phrase. Note that you can also define phrases directly and use dynamic variables in the body of main.dsl using the #sayText() function and string concatenation.
      "greeting":
      {
        "first":
      [ { "text": "Hello! Thank you for calling ACME Insurance claims help line. My name is Dasha. I will be your artificially intelligent agent today. Can you please introduce yourself?" } ],
      "repeat":
      [ {"text": "I was just saying, can you please introduce yourself? " } ]
      },

      "pleased_meet":
      {
        "first":
      [
        { "text": "Pleased to meet you " },
        { "id": "name", "type": "dynamic" },
        { "text": ". How can I help you today? " }
      ],
      "repeat":
      [        {"text": "I was just saying. How can I help you today " },
        {"id": "name", "type": "dynamic" },
        { "text": "?" }
        ]
      },
Now, let’s take a look at data.json to get a grasp of the neural network training data. We are looking at the named entities section of the file. Under ”values” we define the types of names that a person might have. Note that the ”open_set” parameter is set to true. This means that the AI is free to substitute various other names for the ones we provide to it as an example. To help it recognize where the names can be located in the body of the user’s response, we provide ”includes”.
 "entities":
 {
   "name":
   {
     "open_set": true,
     "values": [
       {
         "value": "Jim Smith",
         "synonyms": ["Jim Smith"]
       },
       {
         "value": "Tony Montana",
         "synonyms": ["Tony Montana"]
       },
       {
         "value": "Jill Jones",
         "synonyms": ["Jill Jones"]
       }
     ],
     "includes": [
       "My name is (Tony Montana)[name]",
       "My name is (Jill Jones)[name]",
       "This is (Jim Smith)[name]",
       "(Jim Smith)[name] calling",
       "(Jill Jones)[name]",
       "I'm (Tony Montana)[name]",
       "(Tony Montana)[name]"
     ]
   },
Moving further down in main.dsl we come upon digression policy_1. This digression gets called up when the AI identifies intent which corresponds to ”policy_check”, as stated in data.json.
Here is where it gets interesting. Take a look at the following three nodes:
digression policy_1
{
    conditions {on #messageHasIntent("policy_check");}
    do
    {
        #say("what_policy");  //ask for policy number
        wait*;
    }
    transitions
    {
        policy_2: goto policy_2 on #messageHasData("policy");
    }
}

node policy_2
{
    do
    {
        set $policy_number = #messageGetData("policy")[0]?.value??""; //set $policy_number wit the value acquired from the user
        set $policy_read = external convert_policy($policy_number); //call up external function to add spaces between numbers to help the AI read out the numbers more legibly
        #log($policy_read);
        #say("confirm_policy" , {policy_read: $policy_read} ); //read policy number back out to user to confirm it was heard correctly
        wait*;
    }
    transitions
    {
        yes: goto policy_3 on #messageHasIntent("yes");
        no: goto policy_1_a on #messageHasIntent("no");
    }
}

node policy_3
{
    do
    {
        set $policy_status = external check_policy($policy_number); //call up an external function to check the policy
        #say("verification_result", {policy_status: $policy_status} );
        wait*;
    }
    transitions
    {
        yes: goto can_help on #messageHasIntent("yes");
        no: goto bye_rate on #messageHasIntent("no");
    }
}
As you can tell from the code and the comments, we ask the user to state their policy number in digression policy_1, the number is identified as per instructions to the neural networks in data.json under ”entities” > ”policy”. In node policy_2, we store the policy number, call up an external function to send the number value to index.js, where we put spaces between the numbers. The reason for this is - a string of numbers that have no spaces between them will be read by Dasha out as the integer value, for example, one thousand fifty, versus one zero five zero. We put the spaces between the numbers, pass the value back to our app and store it as $policy_read. This number is then read out to the user, to confirm that it was heard correctly. If the number is read incorrectly, the AI asks the user to repeat it. If it is confirmed by the user, we go to node policy_3. Here we call up an external function to check the policy number and verify that there is an active policy with this number. In the case of this demo, we simply pick one or two outcomes with random chance. In the case of a real application running in production, you will want to integrate with your database and get the data from there.
 // external function convert policy number.
app.setExternal("convert_policy", (args, conv) =>
{
 var policyRead = args.policy_number.split('').join('. ');
 console.log(policyRead);
 return policyRead;
});

 // external function check policy number. Here we are providing a random evaluation, you will want to refer to your membership database
 app.setExternal("check_policy", (args, conv) =>
{
 const policyNumber = args;
 console.log(policyNumber);
 const foo = Math.random();
 if (foo >=.4)
 {
   return "This is a valid policy number. And there is currently one active claim associated with this policy number.";
 }
 else return "There is no active policy with this number. I'm sorry.";
});
Going back to node policy_3 - if the user has no additional questions, the conversation progresses to node bye_rate. Before letting the user go, Dasha asks to rate the interaction on the scale of 0 to 10. If the rating is six or below, Dasha will ask the user to clarify what they did not like about the experience.
You can find this code in main.dsl lines 104-177. Below I will only show the code for node rating_evaluation, as it is the only node dealing with functions that we have not used previously in this tutorial. As you can tell here, we save data collected from the user (rating 0-10) to a variable $rating, which we then convert to an integer. We have to do this because all user replies are saved as strings by Dasha. We then see whether the rating is greater than or equal to 7 or otherwise. Based on the outcome, the conversation develops.
node rating_evaluation
{
   do
   {
       set $rating =  #messageGetData("rating")[0]?.value??""; //assign variable $rating with the value extracted from the user's previous statement
       #log($rating);
       var rating_num = #parseInt($rating); // #messageGetData collects data as an array of strings; we convert the string to an integer in order to evaluate whether the rating is positive or negative
       if ( rating_num >=7 )
       {
           goto rate_positive; // note that this function refers to the transition's name, not the node name
       }
       else
       {
           goto rate_negative;
       }
   }
   transitions
   {
       rate_positive: goto rate_positive; // you need to declare transition name and the node it refers to here
       rate_negative: goto rate_negative;
   }
}
Starting at line 193 and to the end of main.dsl, the remaining digressions begin. These are concerned with the additional questions that a user might ask, once their policy number has been confirmed. These digressions deal with questions such as “what is the status of my insurance claim” and “I’d like to redeem my completed claim.”
In conclusion
Now that you have gone through the conversational AI app, make some changes to it and run some tests, using the commands stated earlier. For your reference:
Run npm i. Now, run npm start chat. A chat session will launch in your terminal. You can also run npm start 12223334455 where 12223334455 is your phone number in international format. You will get a call from the AI and can talk to it.
Let us know in the Dasha Developer Community what you build.